Showing posts with label SDP 005 Toiles. Show all posts

Tuesday, 17 May 2011

1973 Toile Final Evaluation

I was disappointed I didn't get to finish all of the buttons as I think this would have really completed the overall finish of the piece.
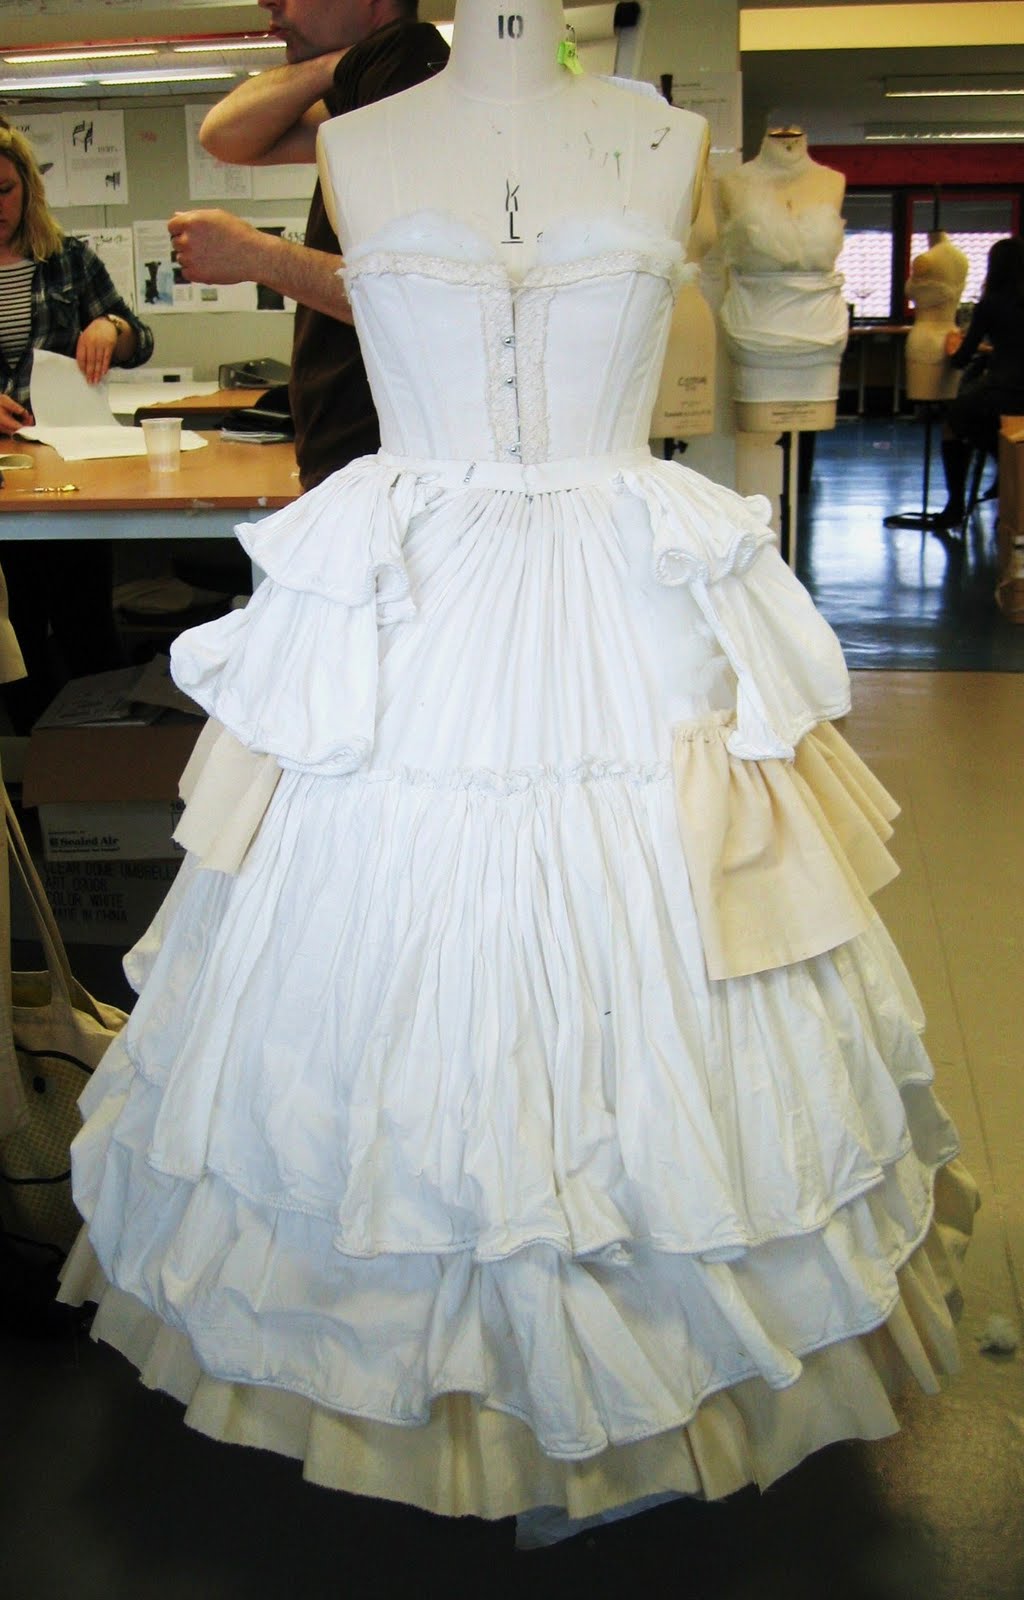
I was very happy with the quite neat silhouette of the toile and the subtle contrasts between fitting and volume which the calico shows nicely.
I think the pleats of the skirt look neat and follow on well from the line of the box pleats above. Despite taking me a very long time to get right I was pleased with the underskirt in the end.
This toile has been the most stressful of the four total pieces I have created for this unit. This was mainly down to the limited time in which I had to complete it, which in the end turned out to be only a week and a half, and also to it being the most decoratively complicated and only full toile. I have worked really hard to complete the toile to a neatly finished standard, with all the different design elements included, in the short period before hand-in and feel quite proud that I managed to achieve it.


I have had to use all my developed skills from the last few pieces to create this toile, including draping technique (from the previous two toiles), working under pressure (trying to keep to the set deadlines) and finishing to a high standard (National Theatre blouse). I think my development shows through in this piece and although I have tried to work to the best of my ability with each part of the unit I think this toile has shown and proved to myself what I can do under pressure and working with a tight time frame.


I think the overall silhouette is quite a good representation of the design, although on reflection I wish I had had more time to spend on getting the overhangs of the rouching, on the underskirt, more loose looking, as it was on the design. I think it has the right feel but in comparison does not match as well as the rest of the dress to the design. One of the key principles I have learnt from this piece is to give myself enough fabric to work with. I found my eagerness to form a shape lead me to cut off too much fabric, resulting in having to attach some when I want to change a shape dramatically. I think the decorative elements of this last toile really complete it and make it something I would be happy to present. I was particularly pleased with my decision to represent the mauve edging shown on the design with two lines of stitching. This wasn't a very time consuming process but is quite effective in representing its decorative attribute by exaggerating the changing hem line. 


Originally my intention was to attach fastenings to the toile to hold it shut, rather than pinning it. I inserted placket to one side, and then was going to have poppers to close it, however ran out of time. This is not how I would have finished the toile as a costume piece, I would have used eyelets and lacing as suggested by the pattern. However for the ease of presenting the piece and displaying it on the mannequin I was going to use poppers as they are quick to fasten. I had also brought and covered enough buttons to complete the decoration of the toile although I felt attaching all of these would not have been a good use if time in the end, and although it would have completed the look more fully, it was not necessary as they would not have demonstrated any developed skill. It is frustrating that I did not get to complete these last elements but as a whole I was happy with the piece 


Overall I was happy with this toile for the time frame in which I had, however I do feel that if I had more time to complete it I definitely could have improved it by taking more time on the hand stitching of the front panel and getting the drape of the underskirt right by changing the pattern and experimenting with different ways of getting the right drape using the tape. One of the defining elements of this last piece I have noticed is that I have developed much more ability to cope with stress, especially in the last few days.

1973 Toile Development Evaluation

The darts of the front of the bodice were my first challenge to make aesthetically pleasing. This was because of the different shape of the mannequin to that of the original garment, the underwear, although I attempted to replicate the shape as accurately as possible, would have been different and generally the sizing and body shape would have not been the same. This resulted in me having to extend the length of the darts much further down the front of the bodice than that of the design and pattern. I tried my best to keep the as short as possible but to achieve the right fit they had to be made longer. I was not happy about this at first but as the toile developed this feature was not really noticeable.


The length of the dart here can be seen to be much longer than that of the pattern, in particular the dart nearest the centre front. This was necessary to make the piece fit and did not end up being noticeable as the longer dart was covered by the front decorative panel.
This was my initial attempt at the shape of the hem, later on it can be seen to drop quite a bit to match the length of the underskirt which shallows out the curve. It is almost a shame as I quite liked the curve created here, however the designs hem line is somewhere between the two, which proportionally to the length of the underskirt in the pattern does not work.
I found with the first part of the construction of the bodice I was not giving myself enough fabric to work with. I discovered, with this later style of princess line dress, the change in shape from the top half to the lower half is more than it looks and the volume of fabric needed is much more.The box pleats at the back of the bodice were another example of this. I had followed the pattern in its sizing for the pleats but when constructed on the mannequin there was not nearly enough depth in the pleats for them to sit right. I have learnt steadily through out the project that the pattern is only a guide and that I should allow my self big allowances of fabric when drafting on the stand.


The pleats initially looked a little flat and were creating knife pleats rather than box pleats as specified by the design because there was not enough fabric. The pattern of the design has the seam, of the back and side pieces, sitting in the fold of the pleat rather than the pieces being evenly spaced so it was a bit of a challenge to space them evenly but I achieved it in the end.

I was pleased with the result although on reflection I think I could have made the depth of the pleats even larger. I was particularly pleased with the decorative stitching that I added to represent the edging and I think it works well with all the different levels of hem.
I found the hardest part of this toile was the rouching of the fabric with the tape pieces. It was very time consuming trying to get the opposite sides semetrical especially with the pleats that had to form again from underneath. I re-worked this section of the dress at least four times until I could get it to work. The pleats I did even more than this as I found once swing catched  they could sometimes move exposing the stitching so I had to start again. The placing of the tape was not as straight forward as I had thought as I added it after sewing the skirt together, this was possibly a fatal flaw and resulted in the challenging factor of getting the underskirt even. The pleats also contributed to this, as the tape was not wide enough to cover the length of some of the pleat one side would drop ruining the whole shape of the rouching and the pleat. I solved this by adding an extra length of tape that hung off the main tape to hold the other side of the wide box pleats.
This was one of the earliest attempts to create the rouching effect with the skirt. I was not happy with the way the fabric was falling and went on to change it numerous times after right up until the end.


The levels of the under-skirt look right from the side in proportion to the rest of the dress here , and these didn't really change, it was just the sit of the pleats underneath that was the main problem.
The general construction of the under-skirt I found quite interesting. The pattern did not explain how the large amount of fabric fitted into the small space at the back so I had to look at the design for a solution. Eventually our assisting tutor Dexter and I worked out that the skirt was pleated at the top. This pleating followed through to the pleating lower down, being interrupted by the tapes in the middle. This was really hard to make work and took a long time with many attempts to get the pleats straight and looking nice. As I've said this was partly due to the tape but also because of the seams in the underskirt which made the pleats twist. I think this element of the piece would have worked better if the underskirt had been constructed from two opposite panels. If I was going to produce the piece in top fabric I would have tried this method to see if it worked. I think the reason for the three panels of each side of the underskirt may have been due to the limited widths of fabric in the 19th century meaning they would not have been able to create such a large piece.


I think the finishing inside of my underskirt does not match the standard of the rest of the toile and I am slightly disappointed with this. I did not have enough time to complete it to a high standard and just had to focus on getting the pieces to look right from the outside. I was also slightly dismayed that I didnt have enough time to attach all the buttons I had covered, as this was quite a design feature of the piece. However other things had priority and I think I managed to complete everything necessary.
To compensate for not managing to complete all the buttons I had to draw on in pencil the remaining buttons. This was not the effect I wanted but had to be done to save time. I may sew on the rest of the buttons after hand  in to complete the piece.
I was most pleased with the result of my piping of the cuffs and decorative panel. These were elements to the design that I had some apprehension about undertaking as I knew they would be time consuming. But as I had stated in my brief that this final toile was to be a presentable costume piece, I felt it would look much more aesthetically pleasing if the decorative parts were fully complete. This put a lot of extra stress on myself up to the deadline, leaving me a day to finish my blog however I was glad I completed it as it really makes the piece.


Wednesday, 11 May 2011

1873 Toile The Beginning

This is the third and final toile that I shall create for this project. I shall be drawing on all the techniques and skills I have previously learnt to help me complete this toile in the short time that I have. Due to this short amount of time I shall only be creating the bodice section of this design as I do not feel I would learn any more from drafting the skirt as well and this would make finishing for the deadline impossible. This toile is to be a fully constructed piece with neatly finished edges as to be a presentable piece demonstrating my draping in a more finished form.
The pattern for this toile is from Norah Waugh's The Cut of Women's Clothes. The shape is an interesting mix between the princess line and a polonaise and should be a challenge for draping. I shall start by drafting the pattern pieces in calico on the stand and then transfer them to a paper pattern. From this I shall use to construct the full toile from pre-shrunk, washed calico which is a much softer fabric and will drape and show my pattern cutting nicely.


This crinoline I had spotted in our initial research into the costume store and knew I would probably use it for a later toile. It has the right flatness at the front with the sloping back that had potential to be padded out. It had a small amount of volume and length two factors which I thought would suit the design.


This was the next stage of building up the silhouette on the mannequin. I found this great flounced petticoat and then lifted the back even more by placing a bum roll underneath the second layer of flounces. This really created the volume needed for the back of the bodice and skirt.


 The final stage was to add the last thin petticoat to help smooth out the layers of the petticoat underneath. I also added some flounces to represent those on the underskirt which I would not be creating. This gave me a sense of proportion and height to make it easier to work from the design. Overall I was pleased with the silhouette I created with the undergarments and felt I had used the costume store to its capacity to create my required shape with various undergarments. I was also quite grateful to having made it ready to start before I began on the last toile week as this saved me a lot of time.

Sunday, 10 April 2011

1852-6 Toile Final Evaluation

I was very pleased with the silhouette and half wished I had the time to create it as a full toile.

I am glad I chose to make the sleeve out of muslin in the end as I think light cotton would have looked too strong against the rest of the muslin. I think the bell sleeve compliments the wideness of the skirt well and helps to balance it.

Initially I was worried about the muslin flounces lining up but in the end they looked good and straight.
The production of this toile I found enjoyable but still challenging. Working with muslin was a new process for me as it is a delicate fabric which is something I have not worked with on a large scale before. I learnt a lot about its qualities of manipulation and its difficulties, in terms of fraying and loose weave. I had troubles with hemming/finishing, the toile being finished to a relatively neat standard but not completed as it would for a final piece, as the muslin moved and stretched a lot under the sewing machine. I over came thing by being careful and taking my time when sewing, pinning and holding the fabric in place with extra care.

The end shape of the toile I was quite pleased with and think it is a good representation of the design given with the pattern. As the fabric was of a light nature I spent extra time creating the right undergarment shape, and although this set me back more time than I had planned I think it benefited then end result. Creating the lining of the bodice I found easier this week, as I am now getting a feel for creating the right shapes as defined by the pattern and keeping the fabric smooth, and it did not take me too long to complete. The skirt however was more challenging, purely because of its sheer length and the amount of fabric required for creating the cartridge pleats the whole way round.

Due to the few set backs I had in the week with this toile, mainly the finishing off of the previous toile from the week before, I had a bit of a struggle with keeping up to date on my proposed time frame. This was much aided by taking the mannequin home with me enabling me to finish over Easter and have a fresh start for the summer term. I also strove to get as much work done as possible in the studio and I feel my late nights there paid off. As I was struggling with time I decided to leave out the few small decoration elements of the piping around the neckline, armhole and waist, which I was disappointed with but could not fit it purely for a presentation factor.


 If I had a chance to produce the piece again I would have liked to spend more time on being more accurate with the flounces on the skirt. I had trouble with the bottom length and it ended up being slightly uneven on its attaching seam. I was not happy with this but due to the time frame had to leave it. If I had more time I would have produced a new layer for the flounce, as I think the strip I was using had become slightly stretched so was not even. Overall I was very pleased with this toile, I feel I've learnt a lot about working with an alternative weight of fabric and also my capability of picking up my speed when in a working environment.  

1852 – 56 Toile Development Evaluation

The process of production of this toile got off to an easier start than I had anticipated, the bodice lining I found quite easy to produce as I had already developed my skills on the first toile. I marked the neckline and muslin stitching lines in black tape so they could be seen through the top layer of muslin. The muslin was quite a challenging fabric to work with because of its loose weave and tendency to fray, move and slip a lot. I overcame this by taking my time when sewing but with the small time frame in which to produce my toile it was not as neat as I would have liked.


The cartridge pleats were a technique I had not tried before but was pleased with the end result. I put time into getting them spaced evenly and thought a lot about the process and the amount of fabric required before starting and this ended in only having to do one draft of the skirt which I was pleased with. The flounces however I had misjudged, making the muslin the same length as the skirt. This mistake meant I couldn't gather the fabric so I had to create another length of each to gather onto the cord which was a costly mistake and took extra time to complete. The technique of gathering the flounce on the cord was specified by the pattern so I stuck to this and it worked well over the very long length of fabric and normal gathering may not have, it also didn't have the added risk of the thread snapping which was useful. My only concern was the volume of the flounce, at first I though it may not have been enough, although once complete I think the skirt is quite an accurate representation of the design, the overall volume of the fabric creating quite a stunning effect. The flounces of the skirt have a very small overlap of each other, this is because I kept to the historical pattern, which probably had this small overlap to save on fabric. If I was making the piece for theatre I would have made this overlap much larger to allow for movement in the costume and to make sure the supporting calico was not seen.
This is my first cartridge pleating sample. I produced this with 1.5cm gaps between  stitches and without wading. I realised the length of the stitch did not really effect the size of the gather but made the pleat deeper in width. The sample was made just with washed calico to see how the pleats would form.I found the pleats on this sample a bit too thin compared to that of the design so decided to try backing the stitching with wadding. 
This is my cartridge pleat sample backed on wadding. I reduced the depth of the pleat to 1cm between stitches to reduce the bulk that would be created where the skirt is button hole stitched onto the bodice. On my skirt I applied a layer of muslin over the top, incorporating it into the stitching. I was pleased with this sample and used this process to create the cartridge pleats on my skirt.


The front of the bodice was another challenging area. The pleats from the shoulder took along time to get looking right as they were unevenly paced on the pattern and with the gathering at the bottom of the bodice the line of the pleats was quite important. The nature of muslin is quite unforgiving so I had to work carefully and managed to achieve the right shape. This was aided by the interesting sewing lines that connected the muslin to the calico lining underneath. Although it was a slight challenge to make sure it was hidden the seam did more than I thought it would in aiding the shape of the pleats to stay in place. A useful technique that I may use again in future pleating of delicate fabric.


The sleeves I found to be the most challenging part of this toile. This was mainly due to getting the different layers to work together and working out how to adapt the pattern to fit my specifications. Scaling up the pagoda sleeve was a bit of a mathematical nightmare but I overcame it with patience and perseverance! Getting this to sit well with the engagante sleeve underneath, which I had to find a pattern for, involved lengthening and reshaping the under sleeve, and then getting them all to work as one piece. This technical element I found stressful at the time but once complete I realised how much it had progressed my thinking and confidence in my problem solving.
This is the engagante sleeve and under sleeve. I had to extend the length of the under sleeve to ft my purpose and also extended the length and width of engagante from the pattern to introduce more volume to try and match that of the design.

I had also experimented with creating the over-sleeve in a light cotton, (unfortunately no photos) as the muslin I could not get to work initially, it was looking too messy and uncontrolled.. I found this looked too heavy and strong against the rest of the dress which will all be muslin. This made me try the muslin again and I managed to get it looking good with some tweaking so I was very pleased with that as it kept the piece looking delicate.

1852-6 Toile Planning and Evaluation

 Proposed weekly plan (04.04 – 10.04)

Monday
  • Finishing first toile as set behind from previous week -

  1. Tacking over sleeve
  2. wadding sample
  3. apply decorative strip down front
  4. mark hem with wadding lines
  5. mark hem lines
  6. tack belt, over sleeve and collar
  7. make pattern from back of skirt
  8. final photos


Tuesday
  • morning – obtain correct underwear from costume store, sew onto mannequin
  • POP and blog tutorials
  • complete bodice lining
  • cartridge pleat sample and start skirt
  • start drafting sleeves


Wednesday
  • finish drafting sleeves and cut from top fabric
  • make up sleeves
  • complete top layer of bodice in muslin


Thursday
  • put bodice pieces onto paper for pattern
  • complete flounces on skirt
  • sew skirt to bodice


Friday
  • Evaluation and photographs


Actual Time Record of Progress (04.04 – 10.04)

Monday
  • Finishing First Toile -

  1. Tacking over sleeve
  2. wadding sample
  3. apply decorative strip down front
  4. mark hem with wadding lines
  5. mark hem lines
  6. tack belt, over sleeve and collar
  7. make pattern from back of skirt
  8. final photos


Tuesday
  • Underwear –

creating extra frills for skirt, adding padding to skirt to get right shape
  • Tacking skirt and crinoline to corset to hold in place
  • POP and blog tutorials
  • Researched engagante sleeve
  • started lining of bodice

  • Cartridge pleat sample


Wednesday
  • Finished lining of bodice
  • Haberdashery for muslin and washed calico
  • Drafted under sleeve then adapted to make thinner and slant more to be more fitting
  • Drafted Pagoda sleeve
  • Drafted Engagante Sleeve
  • marked cartridge pleats on the top of the skirt, muslin on top and wadding
  • cut sleeves from top fabric, finished including hems


Thursday
  • put sleeves together
  • Started back and side of muslin top layer of bodice
  • sewn through cartridge pleats to gather
  • started to measure out and make frills for skirt
  • hemmed calico under layer of skirt
  • hired out mannequin to take home to continue work


Friday (no studio)
  • realised had made mistake with frills, so had to repeat creating them to double length
  • sewed on frills to skirt
  • Completed front top layer of muslin on bodice


Saturday
  • Copied bodice pieces onto paper
  • Sewed sleeve into bodice
  • Pulled in cartridge pleats of skirt and attached to bodice with button hole stitch


Sunday
  • Evaluation and photographs


Time Frame Evaluation

Sourcing correct underwear for the shape of the skirt was not as straight forward as I had anticipated, the design with the pattern stated that the undergarments were made of lots of layered and starched petticoats. As the costume store is limited I had to substitute the multiple layers of petticoats for a large round crinoline, with a layered flounced petticoat on top, to soften its edges. This worked well but did not quite have the shape that I wanted so I had to spend time creating and adding extra calico flounces to the petticoat, as well as padding out some areas with wadding, to achieve the more rounded shape I wanted. Doing this extra work to the underwear I hadn't anticipated as I had previously seen what I wanted from the costume store and thought it would be suitable so did not factor in time to alter it.
Skirt took longer as I hadn't anticipated including the muslin in the first layer of cartridge pleats to create the first flounce. I didn't loose too much time on this as it took a long time to mark the spacing for the stitches so I just marked the calico then left it to one side until I had the muslin the next day. Another element of the skirt that put me behind on time was creating the flounces, I had made a mistake with the measurement so when I gathered them along the cord they only had enough length for half the skirt. As I basically had to re-do the flounces again, adding the extra length this cost me double the time.
Simple things like hemming the muslin on the flounces and the sleeves also took much longer than I thought, as it is quite a difficult fabric to work with.
I was pleased with my time management of drafting the sleeves and bodice layers, I feel I worked efficiently in these areas and although the mathematical element, of scaling up the sleeves and altering some of the shapes, was challenging I stuck to it and managed to get it finished relatively quickly for the task.
One of the most time consuming areas was the skirt, mainly because of the mistake I made, but generally working with that amount of fabric is quite challenging and takes a long time to complete something, like the hemming of the different flounce layers, for the whole length.
As I was able to rent the mannequin from the studio I feel I managed to get the piece completed without too much stress. Having the extra weekend and bank holiday made a big difference and allowed me to complete the toile to a standard I was happy with.
I feel I have learnt quite a lot of technical skills on this toile production and feel my time management and focus on working is getting better. On the next part after Easter I feel I may need to try to stick more rigidly to my time plan if possible, however as we only have three days of the week in the studio due to bank holidays this might be an impossible task. I will have to consider changing my time frame for the remaining three weeks, to get a reasonable time frame to work to.

1852-6 Toile The Beginning

This is my second exploration into cutting of the stand.  I am interested to see whether the skills I have learnt in producing my first toile will be transferable to this one, being of a different silhouette and using different construction methods.
This pattern for a muslin dress I have take from Janet Arnold's Patterns of Fashion 1. It represents quite an iconic shape of the 19th century for me and I am excited to start making it. I am going to start by draping the lining of the bodice and flat drafting the skirt and under-sleeve. On top of these I shall add the muslin layers in which the decorative elements of pleating comes in to almost every area of the dress.

I was pleased with finding this crinoline and feel it is a very appropriate shape for the period. It sits quite low at the back but this can be improved on with the adding of extra undergarments. As a basic under structure I think it is a good width and has the appropriate sort of volume I wanted for this toile. 

The second stage of constructing the correct silhouette for my toile was adding the flounced petticoat and then adding extra calico flounces and padding  underneath the existing ones to make it perfect. The images here are after I completed my alterations to the shape, I concentrated on rounding off the hips more to help the cartridge pleats of the skirt stick out. The extra flounces were for volume but also to create a more even shape down the shirt and to soften the bottom of the crinoline that was showing beneath the petticoat.

I was very happy with the resulting work of padding out the undergarments, especially as it took roughly a whole day in the studio to complete. It was quite a labouring process but the final result and the shape it will create for my draping was worth it.  


Tuesday, 5 April 2011

1820 Toile Final Evaluation

This 1820's toile came to be more challenging than I had originally thought. The basic construction of the bodice and skirt was quite simple and just needed a little common sense and relating back to the cutting on the stand classes at the beginning of the year. It was however the decorative elements that took a lot of time. I had not anticipated how demanding they would be and although I produced the patterns quite quickly the construction and experimenting to get the right form was quite time consuming.

I found the week of construction of the toile very stressful, this was mainly down to not anticipating the time that I would have to spend on other activities and classes, like our Candide performance and POP lectures. I feel I have done well to produce what I have in the time and am pleased with what I have produced, although I am disappointed to have finished a day later than my original time frame as this will have a knock-on effect into my next week and new toile. 

I have learnt a lot about time management and being flexible, and am striving to use my time in the studio as best as I can with not being able to take the toile off the stand. I have learnt that I need to be better prepared in terms pre-buying the fabric I am going to need, and not waiting until the day, as this held me up on one occasion, although I managed to fill the time, it was not the most efficient or logical was of working as I had planned.

In terms of skills I have learnt more about relating a pattern to cutting on the stand and using the grain lines and proportions as well as the reference image to work out the size of each piece. I really enjoy the process of building it up and being governed by the fabric, finding an exciting way to work. I have also found that going away and coming back with fresh look really benefits my ability to see the design lines more clearly and judge if something is out of place.

Overall I have enjoyed the experience of my first toile on the project and have learnt a lot about improving the way I work as well as drafting skills. The main points I shall try and improve on in the next week of drafting shall be to record my changes as I do them, in written and photographic form so I can see how it was before and after. Planning ahead is also very key and trying to keep to the working frame I have created as much as possible.

1820 Toile Development Evaluation

The creation of the 1820s toile was challenging but all problems that were presented I managed to overcome. Initially it started well and i found the front and back of the bodice reasonably easy to form as it was a simple shape and related almost directly to the cutting on the stand classes that were taught at the beginning of the year. It was decided in my tutorial that the main inspiration for the cutting comes from the draw images themselves using the accompanying pattern as a guide and not as a strict rule as to how the pattern should be shaped.


The front panel of the skirt threw up a small issue when i realised the pattern piece presented with the drawing of the dress had a curve in the waist line towards the back but a straight hem. I tried to achieve this with the skirt and managed it although my pattern piece has a slightly more sloping hem due to the more modern proportions of the mannequin. 


The black tape the can be seen on the bodice was my placing guide for the lattice decoration. It was effective to get a clear design line and was useful when cutting the decoration on the stand as it could clearly be seen through the calico. I created the lattice decoration on the bodice first by draping it and then developing it with flat drafting. This was very effective as I achieved the basic line and lay of the fabric and then refined the complicated shape flat and put it back to the stand to shape it. I was pleased with how intricate the decoration looked and it became more delicate than I had expected as it was drawn in the reference image.

The next challenge came with the back of the skirt. As the design does not have any description more than its colour, I had to look at the fashion of the time and see how the fabric may be brought together at the back, whether it be pleating, gathering or cartridge pleats. In the Cut of Women's Clothes 1600 - 1930 book it states, 'Until the late 1840s the bodices and skirts were usually attached to each other by gauging. Gauging is the method used when a large amount of fullness has to be drawn to s small space...a series of running stitches are made...The threads are then drawn to the requisite size.' Waugh. N. (1968) pg. 149. This I related to the gathering technique. 

Originally I used standard medium weight calico as I had for the rest of the toile. I followed the pattern quite closely to try and achieve the same sense of fullness as in the design. The toile stated that 11 inches of fabric had to be gathered into 2 inches at the centre back. I found this did not work with the fabric i had chosen. The draping of the back of the skirt was also effected and the skirt didn't sit in the folds as it draped as I wanted it to. It was suggested in my tutorial that I may want to use pre-shrunk and washed calico, as this has a much lighter and malleable drape. I was also shown another method of gathering that is much flatter and gives a neater finish that normal gathering. It involves zig-zag stitching over a length of strong thread, securing one end and then pulling the thread to gather the fabric.With this fabric and new technique I was able to add and extra 15cm of fabric at the centre back onto my pattern which created a better drape and more volume.

First attempt with medium weight calico.

Developed piece with pre-shrunk and washed calico and 15cm extra with the new technique of gathering.
After I had drafted the sleeve I realised, looking at the width of it in comparison to the pattern reference, that it was quite wide. This made me re-evaluate the size of my arm hole which I had drawn in without any real though to measurement, going on the reference image rather than my taken measurements. To adapt this I redrew my armhole to a more appropriate size and applied this to my sleeve pattern, also reducing the cuff size to less than suggested. This achieved the much thinner, sleeker shape that was required. I really learnt at this point that I need to be aware of defining how I am adapting the reference material, to a more modern body shape, rather than trying to follow it exactly. Once I had readjusted the sleeve and it fitted well, I had a better grasp on my boundaries of alteration of the patterns and how changing and bending different elements of the pattern works towards a better fit the shape I am working with rather than just sticking to what is given. Later I also changed the shoulder to sit slightly lower to achieve the more sloping effect. This had a knock on effect, also improving the shape of the space between the lattice decoration and the collar.


After completing the sleeve I created the top sleeve decoration. This was one of the biggest challenges. I drafted it flat using the sleeve head from the pattern drawn already and then flat drafted the rest. It fitted well in the armhole but the tendrils looked tangled and unflattering. It took a lot of patience and perseverance to finally get it right. I began to understand from this that some elements just require time and small adjustments to achieve what is needed. 


Overall I found the decoration the most challenging aspect of this toile. This was mainly because it was very fiddly and not only did i have to achieve the right shape but also proportion to my piece. I used the reference pattern quite a bit but I found it proportions were not applicable to my toile so I spent a lot of time redrafting the lengths to achieve the right volume and form. 

 
Once the main decoration was complete I decided to experiment with how the piping that is seen in the reference image would work on the garment. I found the smallest piping cord I could and used it to edge the collar and belt and inserted it into the seams on the back as shown in the reference image. This worked really well and brought another element of texture to the toile, as well as getting a better grasp of what the piece would look like if finished. It also showed that the edge of the lattice decoration is piped so I attempted this although the result was not satisfactory. I think the piping I used was too heavy and it would have to be really thin to be delicate enough for the intricate pattern piece.
I have applied my sample here to see the effect of the piping, it is definitely  too bulky and clumsy and would have to be much thinner to keep the same delicacy.
The design of the lattice was too intricate to bag out with the thickness of the piping so I just sewed it around the edge. It is not a neat finish but gives an element of what the piping may look like.
I also created a small sample of what the padding at the bottom of the skirt may look like with calico and wadding. I did not have time to pad the whole thing but it would have been interesting to see how it would have effected the drape and sit of the hem line. I think it may have made it much stiffer and less flowing which i think would have been a shame.
The width of the padding I followed from the reference pattern.