The pin tucks was the first stage I wanted to complete, being the most time consuming area of the blouse and the front panels being the central structure. I spent a day in the studio carefully marking and sewing these. I used a domestic machine as it was a delicate process and I wanted to feel like I had full control at a slow speed. The result I was very pleased with, knowing the straightness of the pin tucks was very important to the overall finish of the blouse.
My next stage was to sew on the cotton braiding across the pin tucks and down the centre front to join the two front panels together. The braiding, which was also used to decorate the collar and cuffs, proved to be a little awkward to machine stitch. Due to its flexible nature I had to be very careful when stitching and it edges still did not remain as straight as I would have liked. This was because the weave of the braid was quite loose and had a natural uneven edge. I attached it as straight as I could, to not contrast with the rigid lines of the pin tucks and I think I it still looks quite presentable.
The knife pleats of the blouse turned out to be one of the most time consuming processes in the whole making of the garment. In the first instance my fabric, a heavy, rigid, almost corded, cotton was much thicker than that of the prototype and so would not hold the shape of the pleats when pressed. To keep a crisp finish to them that would last throughout the making process of the garment I decided to tack each pleat individually. I tacked the length of the pleat to keep them straight for pressing and also inserting into the seams. The pattern for the pleats I only discovered was too sort when I had the pins in place ready to tack. I solved this by joining an extra length of fabric onto the end of each and hiding the seam in a pleat. I had to do this rather than cutting new strips as I had only scraps of fabric left. I was pleased with the result and I ensured that the seam could not been seen on the topside of the cuff. I think the thickness of the fabric was a contributing factor to the pleats not fitting, however the pattern was also too small.
 |
| In this image the pleats can bee seen to be at least two inches short of the cuff length. |
 |
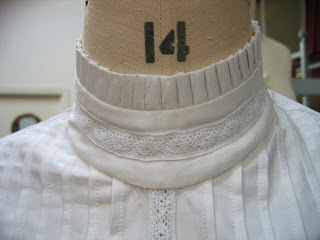
| Here are the pleats inserted into the collar. I left the tacking in until I completed the garment to keep a neat finish. |
We were also required, under guidance of our technician, to improve the finishing standards from the prototype. This included finishing the button stand so no raw edges were visible, and double turning the hem. One of the major changes made was to the collar, cuff and cuff placket. In the original these were top stitched to finish. On my piece I machine sewed the front seam and slip stitched the back. This left a much neater finish with no visible stitching, and made the garment look cleaner in its finish. Looking at the blouse closely I noticed that the knife pleats of the cuffs were travelling in the same direction, I decided it would look more aesthetically pleasing if the cuffs were opposite in the pleats as they are in all other features and so applied this to my blouse.
I had trouble with getting a neat overlocker finish on some of the seams because the overlockers in the studio were not stitching correctly. This has resulted in some of the overlocking on my seams being a little baggy and although I am very unhappy with it the problem with the machines has not been fixed, and I had to get the blouse finished to start the next part of my project. This is the only element I am unhappy with on the blouse and am very proud of my work on this piece.


No comments:
Post a Comment