Showing posts with label SDP 003 Further planning. Show all posts

Wednesday, 11 May 2011

1973 Toile Planning and Evaluation

Proposed Time Plan 09. 05 - 18.05
The hand in time for this final week of the project has been extended by the course from Monday morning to Wednesday afternoon. This gives me extra time to complete the unit and my final toile so I feel hopeful that I will be able to complete the piece to a finishing standard I am happy with.


Monday
  • Draft basic shape of toile, front, side and back panels
Tuesday
  • Refine toile shape
  • Add collar shape and front panel shape
  • Start drafting underskirt panels cut in calico
  • Experiment with pleating skirt at waistband 
  • experiment with creating volume with tape
Wednesday
  • Draft sleeve
  • Draft underskirt in pre-shrunk washed calico to see drape in softer fabric
  • Mark up calico toile on stand and remove
  • Start putting pattern pieces on paper
Thursday
  • Complete putting pattern pieces on paper
  • Cut pattern from pre-shrunk washed calico
  • Put decorative marking on pattern pieces, stitched in coloured thread?
  • start sewing pieces together
  • Over-lock edges
  • Start hemming edges
Friday
  • Complete hemming edges
  • Start decorative elements

  1. belt with bow piping
  2. Piping around edge of front panel
  3. Piping on sleeve
  4. piping on collar 
Saturday
  • Blog
Sunday
  • Blog
Monday
  • Complete decorative aspects
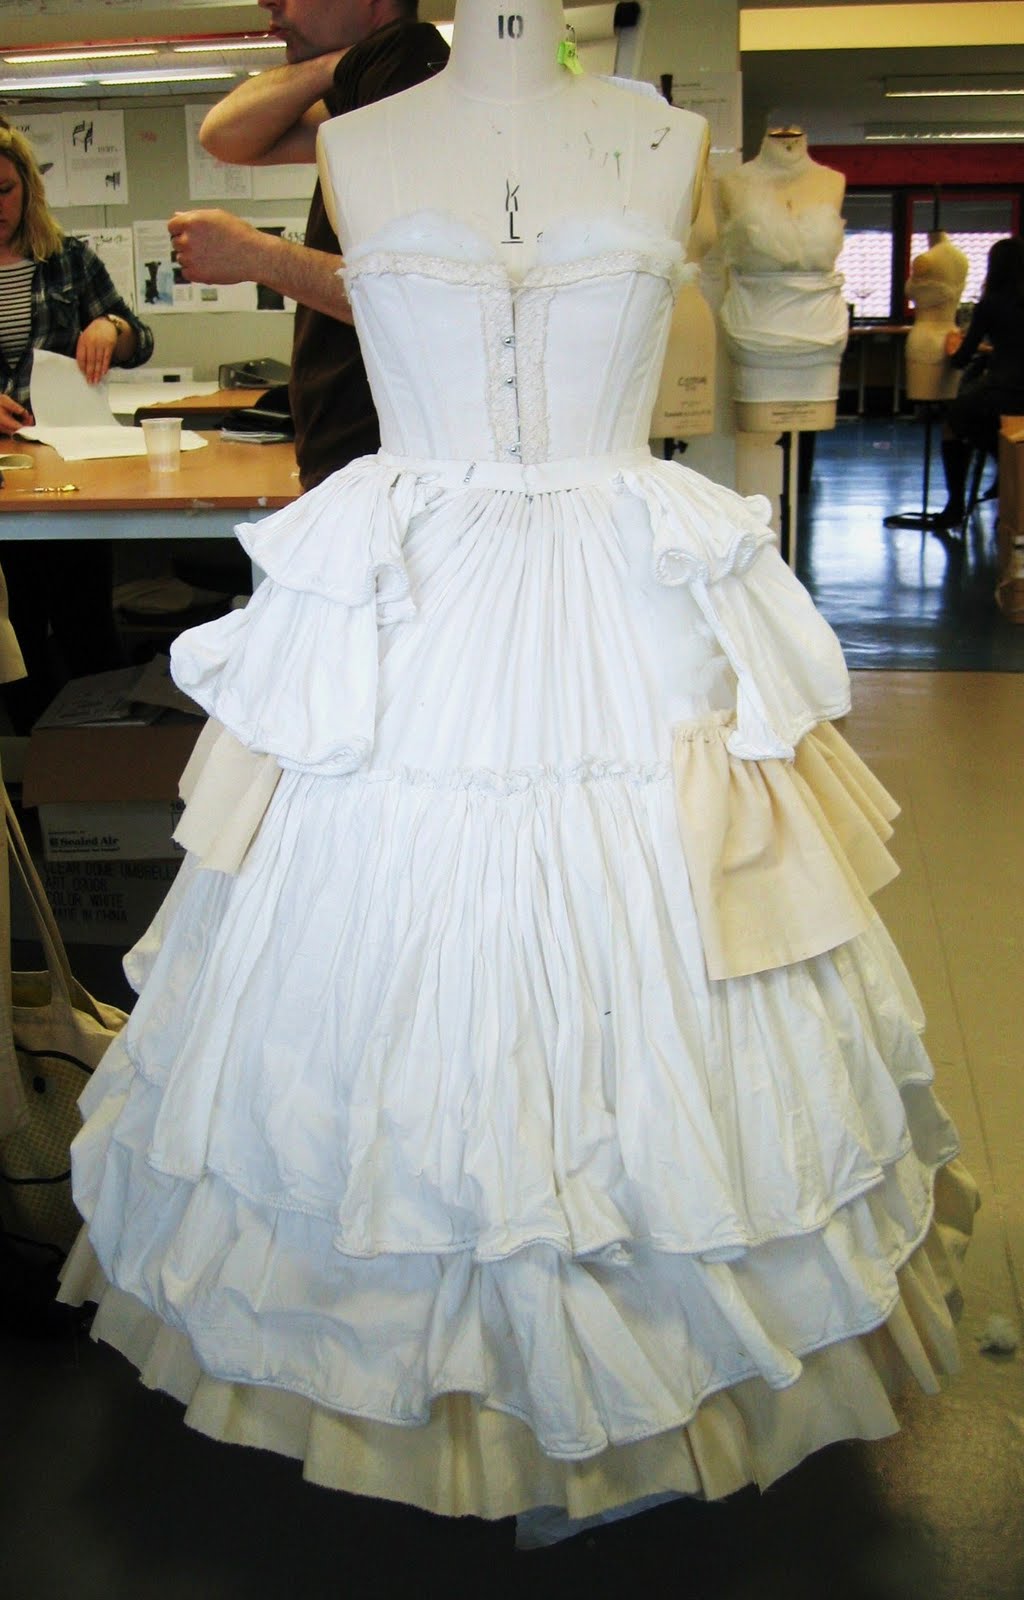
  • Take photos of final piece 
Tuesday
  • Complete blog
Wednesday
  • Hand-In 15.00-15.30


Record of weeks time frame


Monday

  • Constructed front

  1. darts
  2. hem line
  3. collar and decorative panel shape
  4. back and side with box pleats
Tuesday
  • back underskirt drafted and draped
  • experimented with tape on underskirt to create volume
Wednesday
  • drafted underskirt in pre-shrunk and washed calico
  • re drafted shape of underskirt
  • redrafted shape of box pleats on jacket
  • draped front panel
  • Started to put pattern pieces onto paper 
  • Drafted sleeve
  • Swing-catched pleats and further experimentation with tape
Thursday
  • marked up calico pieces to create pattern
  • took first toile of mannequin
  • marked out all pattern pieces onto paper and made some adjustments and neatened some lines
  • transferred into paper pattern pieces and cut from pre-shrunk, washed calico
Friday (Not allowed into studio until 13.30)
  • Hemmed all pieces of bodice and skirt
  • Stitched decorative lines on to represent edging
  • Completed box pleats at back of bodice and stitched into place
  • Sewed skirt pieces together, pleated and attached to waistband
  • stitched underskirt into jacket
  • stitched front and back pieces of bodice together
Saturday
  • piped collar, cuffs, front decorative panels and bagged out
Sunday
  • covered buttons 
  • put sleeves in
  • inserted front placket to dress
  • pinned in place the front panel and cuffs
Monday
  • slip stitched, swing catched and buttons cuff to sleeve
  • slip stitched front panel
  • created and piped belt and bow, and centre front strip decoration (slip stitched on)
  • attached tapes and re-arranged pleats and swing catched in place
  • sew buttons onto front
Tuesday
  • Blog
Wednesday
  • Hand-In 15.00-15.30
Time Frame Evaluation
I was very grateful for the extended date of our hand-in as I was very much needing the time. The National Theatre blouse had set me back in my weekly planning quite a bit and I was seriously debating whether I would be able to complete this last toile to the standard I had set myself in the brief. The piece was still a big challenge to complete in the time frame that I had but I managed to get it done with some courage and perseverance!

When I began the cutting it was helpful  that I had already sourced the undergarments from the costume store, as this allowed me to go straight into the drafting and gave me at least an extra mornings cutting time. Although I indecision on the shape of the darts possibly cost me longer. 


The main time consuming factor was all the decorative features at the end, once the main construction had been done, as lots of hand sewing was involved as well as the piping. As I had specified that my last toile was to be fully complete and neatly finished I could not cut corners and had to make it as presentable as I could despite the limited time. 


There were a lot more elements to finishing this garment than I had previously considered, and only discovered them when I came to the next step in my making. All the details of the design  meant I had to take the mannequin home and spent some very long weekend completing all the elements of the toile until it was at a standard I was happy to hand in. I do not think I would have been able to complete the toile if I had not taken the work home. This has lead me to consider my overall time keeping. If the factors of the extended deadline and ability to take the mannequin had not been there I am not sure whether I would have completed this last toile in the 2 and a half days at uni that we had in the last week before hand-in. I think this was because I fell behind earlier in the project, with everything taking me longer than I anticipated, and this has had a snowball effect to the end of the project. However all things considered I think I have done well to complete this last toile fully having been under a lot of pressure.

1873 Toile The Beginning

This is the third and final toile that I shall create for this project. I shall be drawing on all the techniques and skills I have previously learnt to help me complete this toile in the short time that I have. Due to this short amount of time I shall only be creating the bodice section of this design as I do not feel I would learn any more from drafting the skirt as well and this would make finishing for the deadline impossible. This toile is to be a fully constructed piece with neatly finished edges as to be a presentable piece demonstrating my draping in a more finished form.
The pattern for this toile is from Norah Waugh's The Cut of Women's Clothes. The shape is an interesting mix between the princess line and a polonaise and should be a challenge for draping. I shall start by drafting the pattern pieces in calico on the stand and then transfer them to a paper pattern. From this I shall use to construct the full toile from pre-shrunk, washed calico which is a much softer fabric and will drape and show my pattern cutting nicely.


This crinoline I had spotted in our initial research into the costume store and knew I would probably use it for a later toile. It has the right flatness at the front with the sloping back that had potential to be padded out. It had a small amount of volume and length two factors which I thought would suit the design.


This was the next stage of building up the silhouette on the mannequin. I found this great flounced petticoat and then lifted the back even more by placing a bum roll underneath the second layer of flounces. This really created the volume needed for the back of the bodice and skirt.


 The final stage was to add the last thin petticoat to help smooth out the layers of the petticoat underneath. I also added some flounces to represent those on the underskirt which I would not be creating. This gave me a sense of proportion and height to make it easier to work from the design. Overall I was pleased with the silhouette I created with the undergarments and felt I had used the costume store to its capacity to create my required shape with various undergarments. I was also quite grateful to having made it ready to start before I began on the last toile week as this saved me a lot of time.

Saturday, 23 April 2011

National Theatre Blouse Planning and Evaluation

Proposed Time Plan (25.04 - 04.05)


I have given myself a week and a half to produce the blouse for the National Theatre due to their being two three bank holidays during this time frame, not allowing me to be in the studio. I am hoping this will be enough time as it is quite a complex piece however the pattern is given to us already drafted.


Monday (Bank Holiday)
  • Planning for week  
  • POP Essay
Tuesday
  • Cutting out pattern from top fabric and marking necessary lines
  • Start pin tucks on blouse
Wednesday
  • Finish pin tucks of front of blouse
  • Sew on braid onto front across and down middle
  • Button Stand on Back
Thursday 
  • Start cuffs and collar, pleats, sew on braiding, sew together and turn through 
  • Sew together front and side piece with braid in the seam.
Friday (Bank Holiday)
  • Blog
Saturday
  • Essay
Sunday
  • Essay
Monday(Bank Holiday)
  • Blog
Tuesday
  • Create placket in sleeve
  • Gather cuffs and shoulder
  • Sew Front and backs together
  • Start sewing in cuffs and collar
Wednesday
  • Finish cuffs and collar
  • Hem bottom of blouse
  • Mark and sew button holes and buttons

Actual Time Record of Progress (25.04 – 08.05)

Monday (Bank Holiday)
  • Planning for week
  • POP Essay
Tuesday

  • Cutting out pattern from top fabric and marking necessary lines
Wednesday

  • Pin tucks on blouse
Thursday
  • Started Cuffs, sewing on braid
  • Pleating fabric for cuffs and collar, had to tack in place and produce extra pleats.
Friday
  • Tacking Pleats
Saturday
  • Blog
  • Essay
Sunday
  • Tacking pleats
  • Essay
Monday (Bank Holiday)
  • Essay
Tuesday
  • Sewed cuffs together, bagging out to finish
  • Sewed braiding across pintucks
Wednesday
  • Middle braid of front
  • Completed cuffs
  • Tacked lace at side of front
  • Decided on undergarments for next toile
Thursday
  • Completed Collar
  • Button stand
  • Sewn together front and side and back
  • Gathering stitches in sleeve
  • Placket in Sleeve
Friday
  • Over locked seams
  • Attached cuffs and collar to blouse, machined and the slip stitched
  • Pinned Hem
  • Tacked undergarments to corset on mannequin for next toile
Saturday
  • Tacked button holes and machined
  • Sewn on Buttons
  • Sewn hem
  • Machine in sleeves
Sunday

  • Blog
Time Frame Evaluation

My time planning these past two weeks was unfortunately hindered by so many days away from the studio in a short amount of time, as well as not anticipating the amount of time the decorative elements of the blouse would take. Having this limited time in the studio and our guiding technician away ill for a few days seriously impacted my time keeping.
 I spent extra time cutting out and marking the fabric at the beginning, as I wanted it to be as accurate as possible to help achieve the best finish I could. The pin-tucks were another very time consuming process that I felt I should not rush, as the lines had to be straight and precise as well as each pin-tuck being produced separately. I was very pleased with the end result although each set me back a full day to complete.
The pleats for the collar and cuffs were one of the most time consuming processes as, instead of just steaming the folds into place, I had to tack the length of each one individually to maintain a crisp look, due to the nature of the fabric I was given. This paired with the pattern piece for the pleats being too small put me behind on schedule by at least two days.
I found with this garment each process took longer than I had planned for, with the need of it to be as accurate as possible and to the best of my ability. Obviously being the first time I have created this garment, and without instructions, I had to spend time considering my process and changing my plans, working out what would be the best way to put the pieces together, during my process of construction. 
I feel I could have possibly stuck to a  full weeks making time, in the studio, for the blouse if I were to produce it again, however this time round I feel I had too many opposing factors to have been able to keep to the time frame. I have worked almost solidly on this blouse when I could from the day I started, so I do not feel I could have shortened my working time on it with out changing some of the contributing factors, like the fabric and pattern.

Sunday, 10 April 2011

1852-6 Toile Planning and Evaluation

 Proposed weekly plan (04.04 – 10.04)

Monday
  • Finishing first toile as set behind from previous week -

  1. Tacking over sleeve
  2. wadding sample
  3. apply decorative strip down front
  4. mark hem with wadding lines
  5. mark hem lines
  6. tack belt, over sleeve and collar
  7. make pattern from back of skirt
  8. final photos


Tuesday
  • morning – obtain correct underwear from costume store, sew onto mannequin
  • POP and blog tutorials
  • complete bodice lining
  • cartridge pleat sample and start skirt
  • start drafting sleeves


Wednesday
  • finish drafting sleeves and cut from top fabric
  • make up sleeves
  • complete top layer of bodice in muslin


Thursday
  • put bodice pieces onto paper for pattern
  • complete flounces on skirt
  • sew skirt to bodice


Friday
  • Evaluation and photographs


Actual Time Record of Progress (04.04 – 10.04)

Monday
  • Finishing First Toile -

  1. Tacking over sleeve
  2. wadding sample
  3. apply decorative strip down front
  4. mark hem with wadding lines
  5. mark hem lines
  6. tack belt, over sleeve and collar
  7. make pattern from back of skirt
  8. final photos


Tuesday
  • Underwear –

creating extra frills for skirt, adding padding to skirt to get right shape
  • Tacking skirt and crinoline to corset to hold in place
  • POP and blog tutorials
  • Researched engagante sleeve
  • started lining of bodice

  • Cartridge pleat sample


Wednesday
  • Finished lining of bodice
  • Haberdashery for muslin and washed calico
  • Drafted under sleeve then adapted to make thinner and slant more to be more fitting
  • Drafted Pagoda sleeve
  • Drafted Engagante Sleeve
  • marked cartridge pleats on the top of the skirt, muslin on top and wadding
  • cut sleeves from top fabric, finished including hems


Thursday
  • put sleeves together
  • Started back and side of muslin top layer of bodice
  • sewn through cartridge pleats to gather
  • started to measure out and make frills for skirt
  • hemmed calico under layer of skirt
  • hired out mannequin to take home to continue work


Friday (no studio)
  • realised had made mistake with frills, so had to repeat creating them to double length
  • sewed on frills to skirt
  • Completed front top layer of muslin on bodice


Saturday
  • Copied bodice pieces onto paper
  • Sewed sleeve into bodice
  • Pulled in cartridge pleats of skirt and attached to bodice with button hole stitch


Sunday
  • Evaluation and photographs


Time Frame Evaluation

Sourcing correct underwear for the shape of the skirt was not as straight forward as I had anticipated, the design with the pattern stated that the undergarments were made of lots of layered and starched petticoats. As the costume store is limited I had to substitute the multiple layers of petticoats for a large round crinoline, with a layered flounced petticoat on top, to soften its edges. This worked well but did not quite have the shape that I wanted so I had to spend time creating and adding extra calico flounces to the petticoat, as well as padding out some areas with wadding, to achieve the more rounded shape I wanted. Doing this extra work to the underwear I hadn't anticipated as I had previously seen what I wanted from the costume store and thought it would be suitable so did not factor in time to alter it.
Skirt took longer as I hadn't anticipated including the muslin in the first layer of cartridge pleats to create the first flounce. I didn't loose too much time on this as it took a long time to mark the spacing for the stitches so I just marked the calico then left it to one side until I had the muslin the next day. Another element of the skirt that put me behind on time was creating the flounces, I had made a mistake with the measurement so when I gathered them along the cord they only had enough length for half the skirt. As I basically had to re-do the flounces again, adding the extra length this cost me double the time.
Simple things like hemming the muslin on the flounces and the sleeves also took much longer than I thought, as it is quite a difficult fabric to work with.
I was pleased with my time management of drafting the sleeves and bodice layers, I feel I worked efficiently in these areas and although the mathematical element, of scaling up the sleeves and altering some of the shapes, was challenging I stuck to it and managed to get it finished relatively quickly for the task.
One of the most time consuming areas was the skirt, mainly because of the mistake I made, but generally working with that amount of fabric is quite challenging and takes a long time to complete something, like the hemming of the different flounce layers, for the whole length.
As I was able to rent the mannequin from the studio I feel I managed to get the piece completed without too much stress. Having the extra weekend and bank holiday made a big difference and allowed me to complete the toile to a standard I was happy with.
I feel I have learnt quite a lot of technical skills on this toile production and feel my time management and focus on working is getting better. On the next part after Easter I feel I may need to try to stick more rigidly to my time plan if possible, however as we only have three days of the week in the studio due to bank holidays this might be an impossible task. I will have to consider changing my time frame for the remaining three weeks, to get a reasonable time frame to work to.

1852-6 Toile The Beginning

This is my second exploration into cutting of the stand.  I am interested to see whether the skills I have learnt in producing my first toile will be transferable to this one, being of a different silhouette and using different construction methods.
This pattern for a muslin dress I have take from Janet Arnold's Patterns of Fashion 1. It represents quite an iconic shape of the 19th century for me and I am excited to start making it. I am going to start by draping the lining of the bodice and flat drafting the skirt and under-sleeve. On top of these I shall add the muslin layers in which the decorative elements of pleating comes in to almost every area of the dress.

I was pleased with finding this crinoline and feel it is a very appropriate shape for the period. It sits quite low at the back but this can be improved on with the adding of extra undergarments. As a basic under structure I think it is a good width and has the appropriate sort of volume I wanted for this toile. 

The second stage of constructing the correct silhouette for my toile was adding the flounced petticoat and then adding extra calico flounces and padding  underneath the existing ones to make it perfect. The images here are after I completed my alterations to the shape, I concentrated on rounding off the hips more to help the cartridge pleats of the skirt stick out. The extra flounces were for volume but also to create a more even shape down the shirt and to soften the bottom of the crinoline that was showing beneath the petticoat.

I was very happy with the resulting work of padding out the undergarments, especially as it took roughly a whole day in the studio to complete. It was quite a labouring process but the final result and the shape it will create for my draping was worth it.  


Friday, 1 April 2011

1820 Toile Planning and Evaluation


Proposed Time plan
Monday 
  • Candide Performance
  • Start Bodice and refine bodice

Tuesday
  • POP Lectures
  • Complete front of skirt and start back 

Wednesday
  • Complete back of skirt
  • Flat draft sleeve and cut out.
  • Draft top sleeve

Thursday
  • Drape lattice decoration transfer onto paper 
  • Decoration samples
  • Start to transfer toile onto paper

Friday
  • Finish transferring toile onto paper.
  • Sew up toile
  • Photographs
Saturday
  • Write up notes and evaluate, photos onto blog.


Record of weeks time frame and evaluation
Monday 

  • Candide Performance
  • Started Bodice

Tuesday

  • POP Lectures and discussions
  • Refine Bodice
  • Start front of bodice

Wednesday

  • Started decoration
  • Started back of skirt
  • Piping samples

Thursday

  • Reproduced back of skirt in washed, pre-shrunk calico, adapting pattern
  • Drafted Sleeve and start sleeve decoration
  • Transferred bodice lattice decoration onto paper 

Friday

  • Transfer toile onto paper.
  • Adjust sleeve pattern
  • Sew up toile
I had a lapse in my time schedule this week, this was mainly down to not anticipating the time required for the production of Candide on Monday and also the amount of time the POP lecture and seminar would take in the afternoon on Tuesday. I started as soon as i could and grabbed moments in the first two days to work but it was not enough to keep up to date with my plan. I was further set back by finding, Wednesday afternoon, that the medium weight calico i was using was too thick and rigid and did not drape smoothly as i wanted for the gathering in the back panel of the skirt. As i did not have any lighter fabric to hand I had to improvise my time (and as i could also not find an available copy of drafting a historical sleeve instructions) I decided to start with the lattice decoration of the bodice. I was pleased with how this turned out as i cut it on the stand to achieve the right shape and curve over the bodice and only had to draft it once. I managed to get the lighter fabric, pre-shrunk washed calico, for Thursday and so could carry on with the main construction. The lighter calico was much more as i had anticipated, and draped smoothly, and because of its thinner weight I also managed to get and extra 15cm of fabric into the gathering giving the back of the skirt a much fuller look. I found getting behind schedule quite frustrating and stressful, knowing it will have a knock-on effect on the rest of my project if i didn't manage to get up to date. Overall I have enjoyed creating this toile and feel it is a nice warm up to the next which may be more challenging. It has given me a good insight into my time management and I have learnt that i must be prepared in advance to keep to schedule.

Thursday, 31 March 2011

1820 Toile Beginning

This is the first of my toiles that i shall be pattern drafting and cutting on the stand.
I shall approach the construction starting with creating the right silhouette with the undergarments, from there I shall start cutting on the stand the bodice and skirt while flat drafting the basic two piece sleeve shape. The lattice decoration I shall leave until last to complete.

The undergarments I chose from the store are relatively appropriate for the time period and although i tried to get them as accurate as possible, this was not entirely achievable with the stock in the costume store, so I decided to look more at what shape they would create under the garment rather than them being completely historically accurate. I had trouble with finding a petticoat with the right shape that was also a good fit so I selected one that was accurate and slightly larger and tacked it in place onto the corset. This also helped it stay in the high waisted placement for my 1820's toile.