Thursday, 31 March 2011

1820 Toile Beginning

This is the first of my toiles that i shall be pattern drafting and cutting on the stand.
I shall approach the construction starting with creating the right silhouette with the undergarments, from there I shall start cutting on the stand the bodice and skirt while flat drafting the basic two piece sleeve shape. The lattice decoration I shall leave until last to complete.

The undergarments I chose from the store are relatively appropriate for the time period and although i tried to get them as accurate as possible, this was not entirely achievable with the stock in the costume store, so I decided to look more at what shape they would create under the garment rather than them being completely historically accurate. I had trouble with finding a petticoat with the right shape that was also a good fit so I selected one that was accurate and slightly larger and tacked it in place onto the corset. This also helped it stay in the high waisted placement for my 1820's toile.


Tuesday, 29 March 2011

Toiles Choices

My final decisions on the shapes and time periods of the toiles I would be producing were decided with Dexter with the intention of developing my learning as much as possible and having different challenges from each. Therefore we have chosen 3 very technically different patterns of garments from 1820, 1852, and 1873, meaning I also have a good range across the time period. I will be confronted with very different silhouettes that will require different cutting skills that relate well and quite broadly to the century and will hopefully develop my learning as intensely as possible, having a week each for the half toiles and 2 weeks for the full toile.
1820
This garment should be a nice introduction to the project, relatively simple in its silhouette it must also be very defined. It also has the complication of the intricate tabs and lattice effect across the bodice and top of the sleeves. As a garment from earlier in the century I shall be learning how to create the empire line and see how this works with the undergarments and changing level of the waist.
1852
This garment from the middle of the century has a completely different silhouette and shall prove challenging  in its shape but also with the amount of pleating involved. The pleats in the skirt are tiered in size and must be aligned to sit and look right which will be one of the main challenges as well as the very even pleats of the front of the bodice. There is also the interesting feature of the inner sleeve with a bell shaped cap over the top which could be flat drafted or draped.
1873

This garment from near the end of the century is an interesting mix of styles, somewhat between a polonaise and the princess line. It will be challenging to create the the long fitted shape and to try and create the rouching of the skirt with tapes, techniques which I will not have experienced with the previous toiles. As I am completing this last toile fully, there will also be the added time consuming factor of piping most of the decorative elements which will put pressure on me to work with speed while producing quality work.

Tuesday, 15 March 2011

Padding the Mannequin

I decided to pad a mannequin to create my toiles on because it gives the mannequin a much softer and flexible shape so the undergarments will sit more like they would on a human figure. It allows my to pull the corset in and achieve the right curves that a hard mannequin would not provide. The mannequin I padded to fit a friend so it will have close enough fit for photos of my final full toile.
This is Jen whose measurements I am using to base my padding of a mannequin on.
I was pleased with the final result of padding out the mannequin, it wasn't very time consuming and achieved a very similar body shape to the friend I had measured. I chose a mannequin with much smaller dimensions so I could pad it up with a lot of wadding to get a softer body shape that could be pulled in a lot by the corset. I measured my friend with and without the corset on to replicate her body shape first with the padding and then with the corset on top to get it as close as attainable.

I am planning on using the same mannequin for all my toiles. This is because of the limited stock in the costume store and the time consuming process of fixing the right underwear, also the corset shape did not change massively throughout the century and I will be able to achieve the appropriate shape by changing the skirt undergarments to achieve the right silhouette.

Research Evaluation

As one of the aims I set myself in my brief was to develop my knowledge of the 19th Century,  I spent a lot of time conducting and gathering a large amount of research for this project, enough to create a large file of images and patterns. This was a very hand reference tool that I will keep it for future use and hopefully add to. Having the abundance of images was really helpful when it came to analysing undergarments in the costume store and seeing which would create the right shape for the period of my toiles. 
The days we spent looking at original 19th century garments at MoDip and The Hampshire Museum was fascinating, and although I don't think it will influence my pattern cutting directly, the reference images I have gained from it and being able too see first hand the different types of decoration and ways of construction I think was invaluable. They also have helped to increase my knowledge, especially with having such an interesting guide as the costume assistant at the Hampshire Museum who passed on lots of interesting and quirky facts about the period and the garment we saw. 
I think if I had more time I would have liked to go to a museum where the garments were on display on mannequins or models to get more silhouette shapes, with real garments, rather than just drawings, into my first hand research. It was hard to picture the fit of some of the bodices when they were lain flat and it would have been nice to see them in a more three-dimensional manner to be able to draw inspiration from when draping.

Research - Costume Store - Undergarments

We looked in the costume store at university to see what range of undergarments there were and which may be of use and would be the right shape for our cutting. We studied the corsets and crinolines and crinolettes. The choice was a little limited in terms of accuracy for each changing silhouette of the period so I have decided to pick the garments based more on their shape and adapt them using layers of petticoats and bum rolls to create the right shape for my toile. It was really interesting to discover properly what the costume store had to offer in terms of undergarments and this morning had definitely expanded my knowledge of how the different structural under garments will work on a mannequin and what will create the right shape and how I can adapt this to fir my needs.
This short crinoline would be a day undergarment and is much like some we saw at the  Hampshire Museum service, and like those could be dated to suit some of the 1850s silhouettes with petticoats over the top.
This crinoline I've judged to be a shape from around the 1860s although I could also use it for an 1850s piece with its wide base. Petticoats would have to be placed over the top to soften the hard edges of the hoops and create the nice soft shape to the top fabric.
I have had to take a guess with this crinoline and suggest the shape may be from the 1870s and worn with a back volume, flounced petticoat. I thought this because it is relatively slim and only tapers a little at the back. I may use this for a later piece as it gives a nice silhouette and could even be a good shape for a princess line dress or something similar if I choose drape one.
This bustle I have dated from research to be of the period around 1880 when the fullness of skirts moves to the back. With the flounces this undergarment would make the dress protrude a lot and would give quite a full bustle. The volume of this could also be adapted by shortening or lengthening the tapes that sit inside.

National Theatre Blouse - Example

As well as my 19th century cutting on the stand I shall also be making a 19th Century Blouse for the National Theatre Hire Department. I shall be cutting the piece from pattern pieces the National Theatre have supplied and using fabric and accessories like the buttons and lace braiding that the supervisors of the project have supplied.
These are my photos I have taken on the example blouse and shows what I shall be striving to achieve a replica of. 
Overall the blouse has a very delicate feel and is very feminine. All its decorative elements are quite fine and understated but as a whole give quite an impact. I shall try to reproduce this by paying close attention to my stitching and make it as accurate as possible. 
The pin tucks and braiding are a key area, which I need to spend as much time as needed, getting straight and even in width and distance apart. It is also imperative the braiding is straight and matches up as it will be all to obvious if not and will spoil the whole look of the garment.
The collar is another prominent feature that will have to be sewn in correctly and with care to get the defined shape around the neckline. The pleats here also need to be accurate and even to get the pristine finish the National Theatre is looking for.
The small amount of gathering at the shoulder is subtle but must be even either side and fall across the same area width of area to make the sleeves look symmetrical.
Attaching the braiding will have to be done before the cuff is put together as it runs into the seam and the stitching is not seen through the inside of the cuff.


The cuffs will be bagged out the same as the collar, joining these to the rest of the blouse will be a question of following the same technique as the National Theatre and top stitching over the edge or possible machining one side and slip stitching the other which may produce a neater finish for the heavier fabric which I will be using.
This insert in the sleeve I will have to be careful creating as it involves cutting into the sleeve to create the opening for the placket that runs inside. Again I will have to ask whether this is to be top stitched the same or finished with slip stitching.
The button stand of the blouse has not been very neatly finished on the prototype and I should think that I will be required to double turn it to hide the raw edge and strengthen it.
The button holes I shall be doing myself and will make sure they are evenly spaced and are not too obtrusive on the overall effect of the blouse, and are just the right size for the buttons. I will probably do this on a domestic machine to achieve a delicate finish.


Monday, 14 March 2011

Research - Undergarments from the period

This section of research is necessary as it is important to know what undergarments were used to give the different silhouette shapes of the 19th century. It shall also help inform my choice in which undergarments to put on my mannequin while cutting for the different styles throughout the period.

This image shows quite well the changing silhouettes throughout the nineteenth (and twentieth) century. All would have been supported by different structures and shapes of undergarments and these are essential in creating the shapes I need for my toiles.
Image from : https://blogger.googleusercontent.com/img/b/R29vZ2xl/AVvXsEhgkB61R5ge0ezUqVAQLXJnlzmvfbeNb85yb1Dr5Lfy_f-CdXtOWm5-oYdh5eOLAO2B4Itr7MemNskIlB8HV5mxR4EBaFQgw3PrgnwlbDPy8I3ss2mGfs31K2ZMKn-woUJTY5gKkPHvTBdm/s1600-h/timeline+historical+fashion.JPG

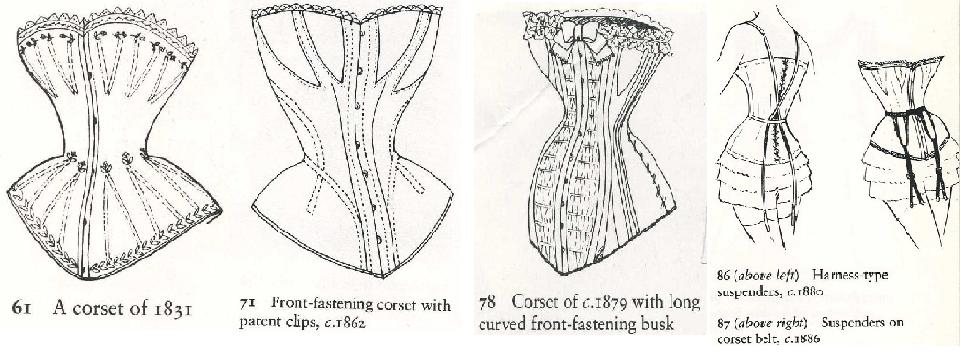
Corsets; 1831, 1862, 1879, 1880, 1886 from Dress and Undress, Ewing. E.
These corsets I compiled together show how the shape of the corset does not vary dramatically  through the century, excluding the beginning of the century where bust improver's were worn. The length and style varies but not particularly the overall shape.
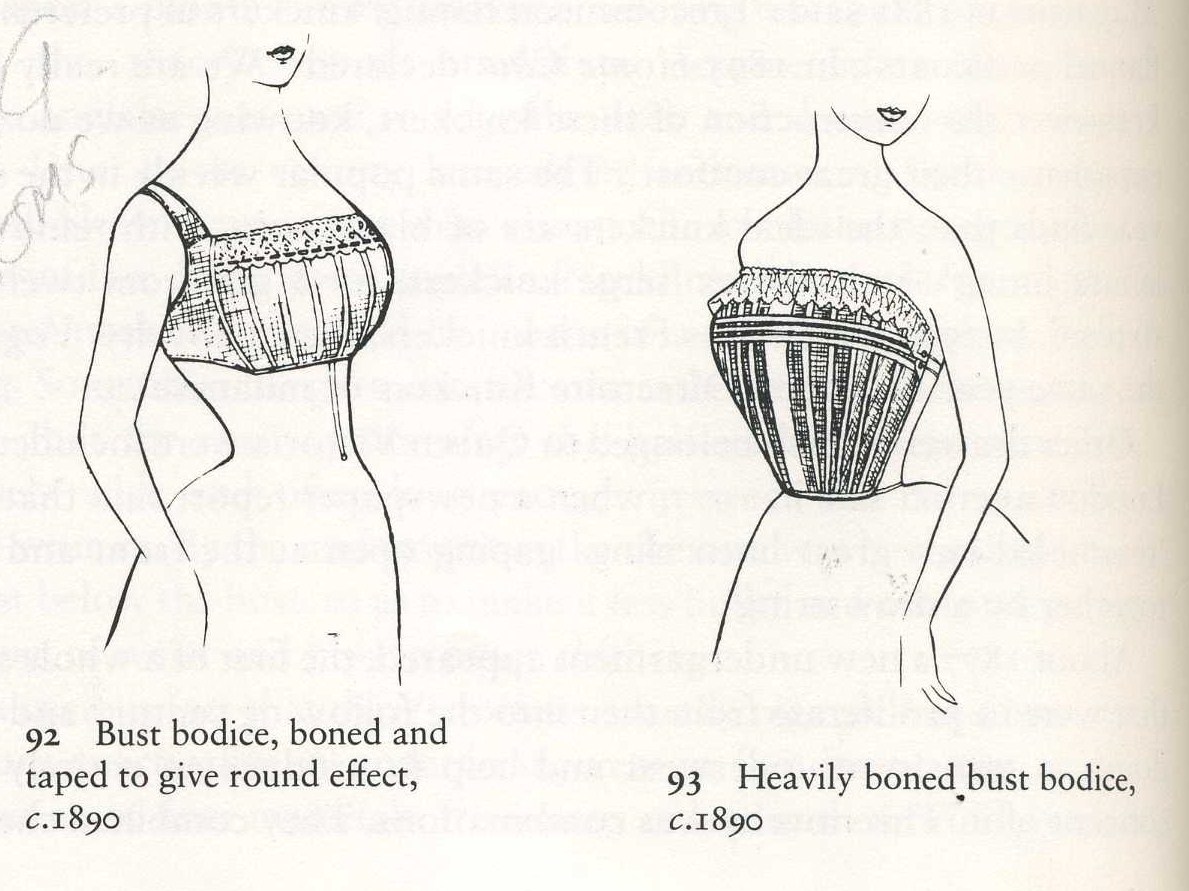
1890s bodices. Dress and Undress, Ewing. E.
Later in the century as the fashion was beginning to change, and under garments were becoming less restrictive, heavily boned bust bodices were worn. As I am not producing a piece from this late in the century I shall not be using this type of undergarment it is however interesting to compare silhouette with that of the corset.
Petticoats and crinolines; 1800, 1830, 1858, 1868, 1872. Dress and Undress, Ewing.E.
It is interesting to see here the changing shape of skirt throughout the century and where the volume changes from around to the back.

The silhouettes created by these different undergarments are dramatic and I find interesting the different draping and manipulation techniques required to cover these structures. I hope to learn some of this during my project and also learn more about how the different undergarments work together, for pattern drafting but also my general costume knowledge. I was interested to see that the corsets did not change dramatically in shape as the skirts had done, although some were more restrictive and tightly laced. I also researched into petticoats, and found they were worn on their own with a bustle earlier in the century, and then over crinolines later on, to reduce the hard lines of the boning and give a softer effect to the skirts.